Article ID Code:GK-SYS-17
This article will help you safely back up important data and protect personal privacy before returning your MINI PC.
In theory, the device not being able to boot does not affect the security of the data inside. By installing the SSD in another device that is functioning normally, you can access the SSD data after booting up. During this process, you may need to reset the PIN and log into your personal Microsoft account, so only the device user has permission to view the data. After booting into the system, start backing up your data. Once the backup is complete, choose to reset the system to erase all personal data. After erasing the data, reinstall the SSD into the device that cannot boot and wait for the replacement device to arrive for swapping. (Even if you do not erase the data, we will erase all data immediately after the return.)
Remove and Keep the SSD/RAM
Steps
- Power off, disconnect the power adapter and all peripherals.
- Flip the MINI PC over, unscrew the screws securing the bottom cover, and carefully remove the bottom cover.
- Locate the SSD, unscrew the securing screw, and gently pull the SSD out at an angle.
-
Reinstall the bottom cover.
For a detailed operation video, please see this article: RAM & SSD & HDD Upgrade Tutorial – GEEKOM Help Center
Warranty Impact Explanation
- Removing the SSD yourself usually does not affect the overall warranty (as long as no human damage is caused, such as bending the motherboard or damaging connectors).
- It is recommended to take photos to record the state before and after removal.
- If you are unsure, please contact after-sales technical support; we can provide specific disassembly guidance for your model.
Price for Keeping SSD/RAM
If you keep the original SSD/RAM by yourself, a price difference will be charged, as shown in the table below.
Capacity |
Price (USD) |
Compatible Models |
SSD 512GB GEN3 |
113 |
All |
SSD 1TB |
198 |
All |
SSD 2TB |
339 |
All |
SSD 256GB |
57 |
All |
DDR4 8GB 2666 |
68 |
AIR12Lite-N100&N150&N95-single; 7505; I3-12300HE; i5-12450H; i7 1280P; i9-12900HK; i7-13620H; i9-13900HK; i5-13600H; R7-5825U; R5-7430U; R5-7530U |
DDR4 16GB |
136 |
AIR12Lite-N100&N150&N95; 7505; I3-12300HE; i5-12450H; i7 1280P; i9-12900HK; i7-13620H; i9-13900HK; i5-13600H; R7-5825U; R5-7430U; R5-7530U |
DDR4 32GB |
271 |
7505; I3-12300HE; i5-12450H; i7 1280P; i9-12900HK; i7-13620H; i9-13900HK; i5-13600H; R7-5825U; R5-7430U; R5-7530U |
DDR5 16GB |
203 |
AIR12-N100&N150&N95; Ultra 7 356H; U5-125H; U7-155H; Ultra 9 185H; Ultra 9-285H; U5-125U; Ultra 5-125H; Ultra 5-225H; R5-7640HS; R5-7535HS; R5-7545U; R7-6800H; R7-6800U; R9-7940HS; R7-8745HS/8845; R9-8945HS; AI 9 HX 370; AI 9 HX 470; AI Max+ 395 |
DDR5 32GB |
362 |
Ultra 7 356H; U5-125H; U7-155H; Ultra 9 185H; Ultra 9-285H; U5-125U; Ultra 5-125H; Ultra 5-225H; R5-7640HS; R5-7535HS; R5-7545U; R7-6800H; R7-6800U; R9-7940HS; R7-8745HS/8845; R9-8945HS; AI 9 HX 370; AI 9 HX 470; AI Max+ 395 |
Laptop memory cannot be removed unless you have professional removal tools.
GMA9MEGAAIMAX+395-1282; GMQS1PROX1-26-100-16500; and memory with LP in the SKU cannot be removed unless you have professional tools.
Backup Data
GEEKOM PC Clone (Recommended)
GEEKOM has developed a dedicated software for data transfer that can be used on computers of all brands: GEEKOM PC Clone (click to download)
Usage please refer to the article:How to Back Up Data to Another Computer? – GEEKOM Help Center
Backup to External Hard Drive (Fast and Does Not Depend on Network)
- Prepare an external hard drive with sufficient capacity (it is recommended to be at least 1.5 times the capacity of your MINI PC SSD) and connect it to the MINI PC's USB port.
- Open File Explorer (Win + E). Find the folders you want to back up (for example: Desktop, Documents, Pictures, Downloads, Videos, etc.) and copy them to the corresponding location on the external hard drive.
-
After copying is complete, safely eject the external hard drive.
Use Windows Backup to Backup and Restore
Refer to the official Microsoft guide: Back up and restore with Windows Backup - Microsoft Support
Backup to Cloud Drive (Suitable for Small Amounts of Files)
We recommend using OneDrive, Google Drive, Dropbox, etc. General steps: install the corresponding client → log in to your account → select the folders to sync → wait for the upload to complete.
Using Google Drive as an example:
-
Upload via Browser:
This method is more suitable for backing up a small number of files. Because file upload speed is limited by the network, uploading a large number of files can easily cause Google Drive uploads to get stuck.
1. Go to the Google Drive official website and log in with your Google account.
2. Click + New, choose Folder upload or File upload.
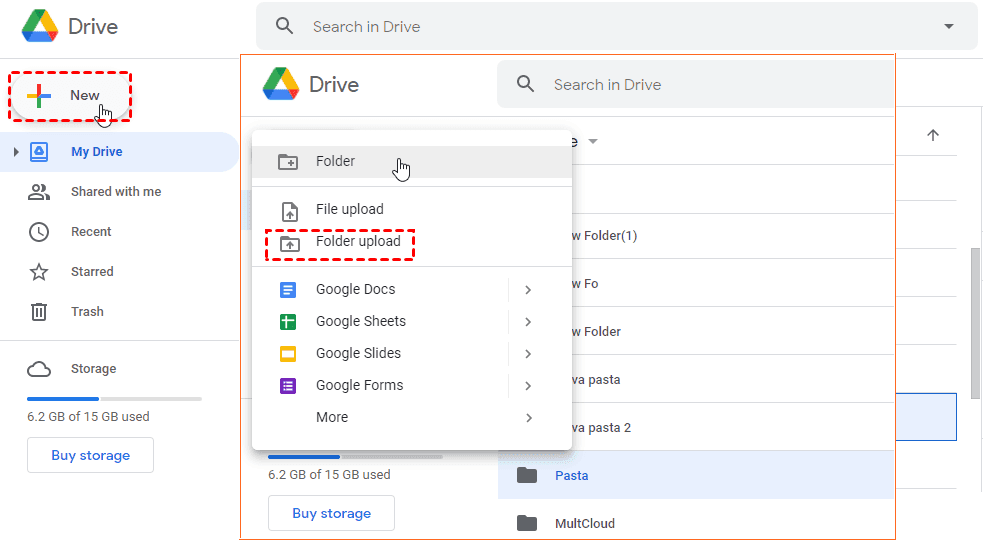
3. Select the items you want to back up with Google Drive, then click Upload.

-
Drag and Drop Files into the Desktop Google Drive Folder
The desktop Drive can only automatically back up files on the Google Drive disk, it cannot back up all computer data.
1. First Install Google Drive for desktop, run the desktop Google Drive on your computer and log in.
2. Enter the Google Drive disk, then drag or copy and paste files/folders (for example data.txt) onto the disk. These files will then be uploaded to Google Drive.
Open the Google Drive website to see that data.txt has been automatically uploaded to My Drive.
Erase SSD Data
Use Windows "Reset this PC"
- Open Settings (Win + I) → System → Recovery, then click "Reset PC".
- Choose Remove everything.
- Choose Local reinstall.
-
Follow the wizard to complete the process; it may take 30-60 minutes.
You can also refer to the Microsoft official document: Reset your PC - Microsoft Support
If you have any problems while operating, please feel free to contact GEEKOM Customer Service for assistance.
Comments
0 comments
Article is closed for comments.